Introduction
FileZilla is a powerful FTP client that allows you to connect to remote servers for file transfer. Whether you need to manage files on your web server or transfer files for development purposes, FileZilla is an essential tool. This guide will walk you through the steps to connect to an Amazon EC2 instance using FileZilla.
Prerequisites
Before you begin, ensure you have the following:
1. An active EC2 instance running in your AWS account.
2. A key pair (.pem file) that you used to launch your EC2 instance.
3. FileZilla installed on your local machine. If not, download it from FileZilla.
Steps to Connect EC2 Using FileZilla
FileZilla requires a private key in .ppk format for authentication. You can convert the .pem file using PuTTYgen:
On Windws Machine:
1. Download and Install PuTTYgen on your machine.
2. Open PuTTYgen, select “Load” and choose your .pem file.
3. Click “Save private key” to save it as .ppk.
If you have Linux machine
Run the below command to install PuTTYgen in Ubuntu.
sudo apt install putty-toolsRun this command to convert the .pem file to the .ppk file.
puttygen my-ec2.pem -o my-ec2.ppkStep 2: Configure FileZilla Site Manager
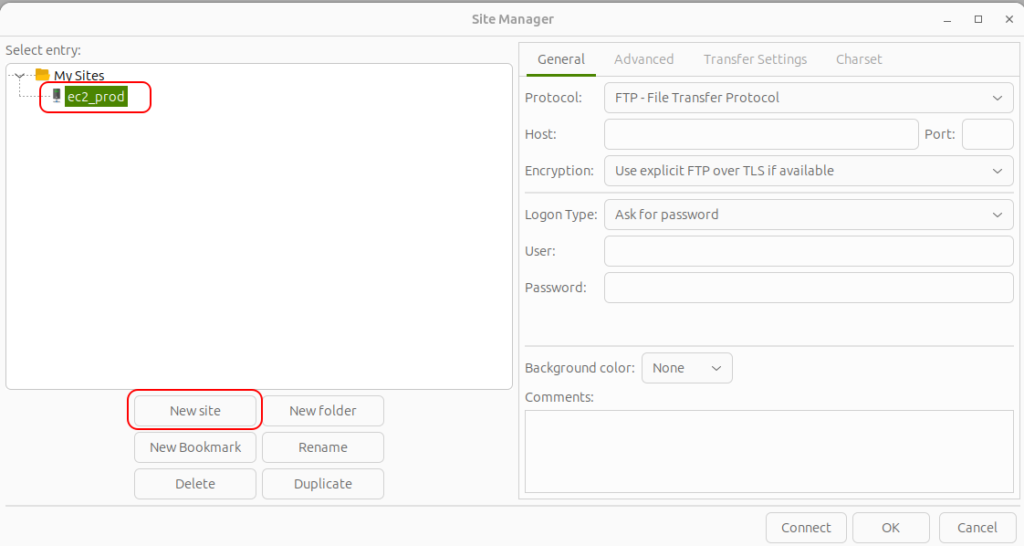
1. Open FileZilla and go to File > Site Manager.
2. Click on New Site and name it according to your preference (e.g., EC2 Server).
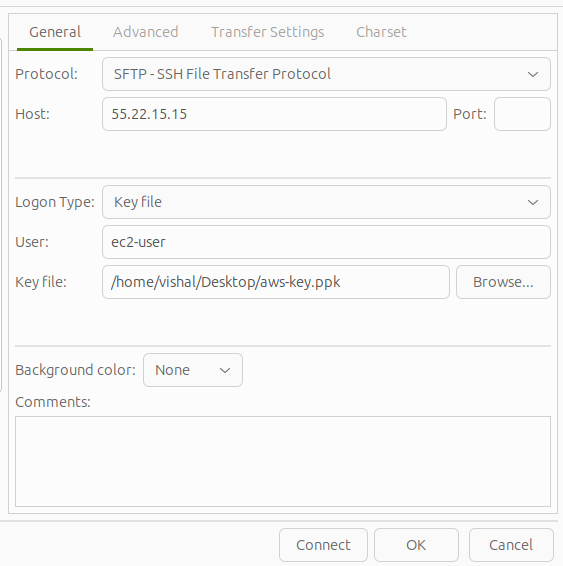
3. Under Host, enter your EC2 instance’s public IP address (available in your AWS console).

4. Set the Protocol to “SFTP – SSH File Transfer Protocol.”

5. Set the Logon Type to “Key file.”

6. For the User, enter ec2-user (for Amazon Linux) or the appropriate username for your OS.

7. Under the Key file field, select the .ppk file you created earlier.

Step 3: Connect to EC2 Instance
Once all the details are filled in:
1. Click Connect in the Site Manager.
2. If this is your first time connecting, you may be prompted to accept the server’s host key – click OK to proceed.
3. You should now be connected to your EC2 instance. The files on the server will appear on the right-hand side of FileZilla
Step 4: Transfer Files
– To upload files: Drag them from the left (local machine) to the right (server).
– To download files: Drag them from the right (server) to the left (local machine).
Conclusion
By following the steps above, you can easily connect to your EC2 instance using FileZilla. This setup will allow you to manage and transfer files securely over SSH. FileZilla’s user-friendly interface makes it an excellent tool for developers and administrators alike.