Introduction
Copying objects from one AWS S3 account’s bucket to another can be a critical task in a variety of scenarios, and fortunately, AWS offers methods for doing so efficiently. In this tutorial, we will look at how to copy S3 bucket objects across AWS Accounts using the AWS CLI and cross-account permissions. If you are new to AWS, I recommend starting with AWS S3 Sync – How To Synchronize Data In AWS S3.
Before starting the process, there are some preliminary steps to ensure a smooth execution:
- You will need two AWS accounts, one for the source and one for the destination bucket.
- Set up an IAM user in the destination AWS account.
- Make sure you have configured the AWS CLI on your system with the user credentials you created in step 2.
- To get the 12-digit AWS Account ID, click on your account name in the top-right corner of the AWS console.
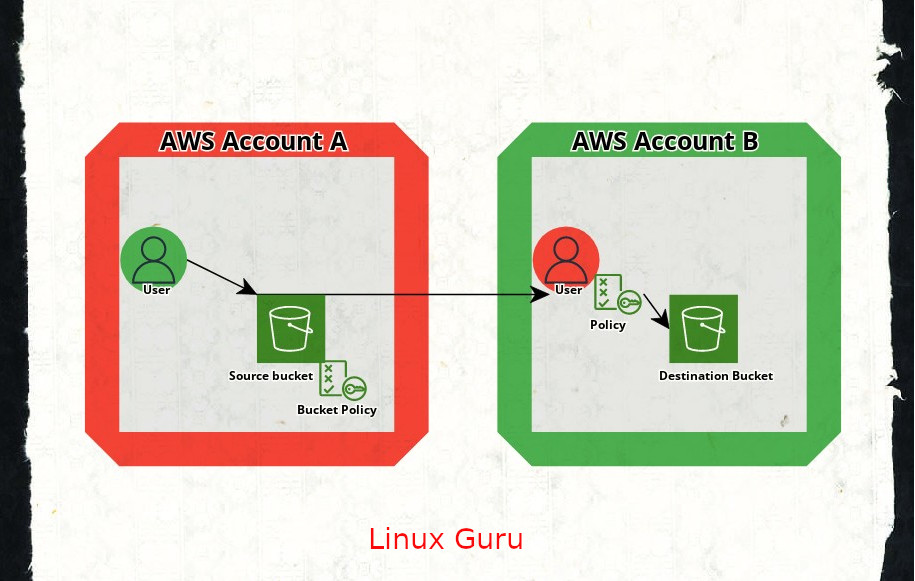
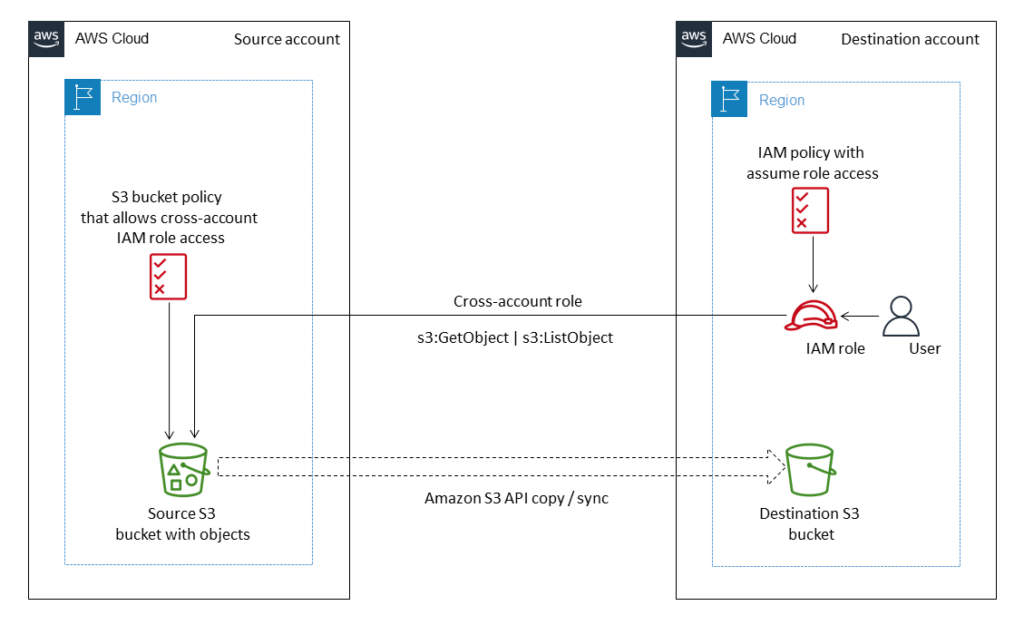
Architecture :
Source Bucket Setup
Let’s start by configuring the source bucket:
- Create a bucket in the source account and add some files to it.
- Apply a specific IAM policy to the source bucket, granting permissions to the destination account. Use the provided policy template, replacing placeholders with actual values.
{
    "Version": "2012-10-17",
    "Statement": [
        {
            "Sid": "DelegateS3Access",
            "Effect": "Allow",
            "Principal": {
                "AWS": "arn:aws:iam::DESTINATION_S3_BUCKET_ACCOUNT_NUMBER:root"
            },
            "Action": [
                "s3:ListBucket",
                "s3:GetObject"
            ],
            "Resource": [
                "arn:aws:s3:::SOURCE_S3_BUCKET_NAME/*",
                "arn:aws:s3:::SOURCE_S3_BUCKET_NAME"
            ]
        }
    ]
}Note: Retrieve the ‘DESTINATION_S3_BUCKET_ACCOUNT_NUMBER‘ from the AWS console.
Destination Bucket Configuration
Configure the destination bucket in the following steps:
- Sign in to the destination AWS account and create a bucket. No additional policies are needed at this stage.
- Create a new user and attach the given policy to an IAM user in the destination account, providing necessary permissions.
{
    "Version": "2012-10-17",
    "Statement": [
        {
            "Effect": "Allow",
            "Action": [
                "s3:ListBucket",
                "s3:GetObject"
            ],
            "Resource": [
                "arn:aws:s3:::SOURCE_S3_BUCKET_NAME",
                "arn:aws:s3:::SOURCE_S3_BUCKET_NAME/*"
            ]
        },
        {
            "Effect": "Allow",
            "Action": [
                "s3:ListBucket",
                "s3:PutObject",
                "s3:PutObjectAcl"
            ],
            "Resource": [
                "arn:aws:s3:::DESTINATION_S3_BUCKET_NAME",
                "arn:aws:s3:::DESTINATION_S3_BUCKET_NAME/*"
            ]
        }
    ]
}
Apply the policy described above to the newly created user in IAM.
Test the Configuration
To ensure that everything is set up correctly, try copying data from the source bucket to the destination bucket using the AWS CLI:
aws s3 sync s3://<source_bucket> s3://<destination_bucket>/ --acl bucket-owner-full-control --source-region <source_region> --region <destination_region>Replace source-bucket with the name of Account A’s source bucket and destination-bucket with the name of Account B’s destination bucket. Replace source_region and destination_region with the AWS region in which the source bucket is located.
Conclusion
This step-by-step guide will show you how to successfully copy objects between AWS S3 buckets in different accounts. This process ensures secure and controlled data transfer, allowing you to manage your resources efficiently across multiple AWS environments.
good informative content.
Thank You!
Ellis Rollins